
Project Requirements
To work with indigitall console you need several basic requirements depending on the channels. Please, you can contact us to ask any doubt. First it is necessary to create each project with all requested requirements for the channels you will use: app push, web push, email, SMS, wallet and chat.
General
To see your projects, access the indigitall console and click on the side menu Configuration.


In the list of projects, the ones you have created will appear, under these parameters:
ID - unique code to identify the project.
Creation date - date the project was created.
Name - name that you have assigned to the project.
App Key - unique and personal value that will link your web / app with the project.
Platform - if it is an app, web or hybrid project (app and web).
To create a new project, access your indigitall console and click on Projects > New.
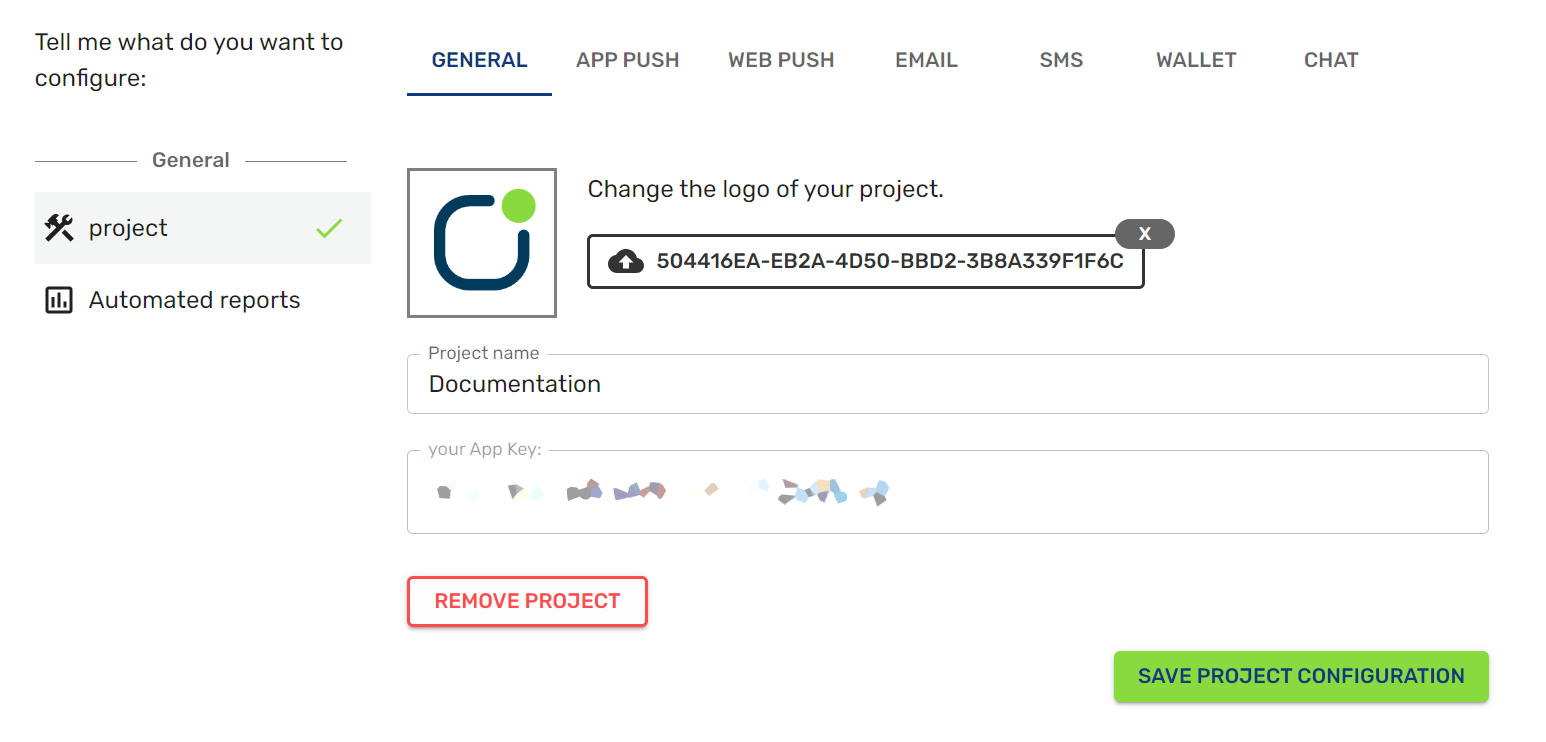
You will see a screen like this:

The fields to complete are:
Image: if you upload an image, it will be set as an icon to differentiate your project from others.
Project name: name for the project.
After clicking on the Save Project Configuration button, another screen appears with the App Key generated automatically.
Automated Reports
Choose how often you want to receive an automatic report of your project, who you want to receive it and in which language.

Next, we will explain how you can configure each type of project.
Web Push
Browsers
Once you have chosen the type of web project, you will see the Allowed Domains field.
This field will indicate which domains have access to your project.
If you leave the field blank, all domains will be accepted as valid, and will be saved with the asterisk * symbol, as you can see in the following image.

Project name - name that is assigned for your website or app.
Image - if you upload an image, it will be set as an icon to differentiate your project from others.
Project type - if you want to create a project for a website, for an app or for both.
Safari
To configure your project in Safari browsers, it is necessary to implement a subscription button to request the permission to receive notifications.
It is important to ensure that users can easily find this button and they can subscribe to your web push notifications. The user has to click on this button before receiving the permission notification for web pushes.
Here's an example code:
<script>
  var indigitallParams = {
    appKey: "xxxxxxxx-xxxx-xxxx-xxxx-xxxxxxxxxxxx",
    workerPath: '/indigitall/worker.min.js'
  };

  function onIndigitallLoaded(){
    indigitall.init(indigitallParams);
    if(indigitall.isSafariPushNotificationSupported() && !localStorage.getItem('indigitall.repository.PUSH_TOKEN')){
        var button = document.createElement("span");
        button.innerHTML = `<div id="indigitall-button" onclick="indigitall.launchNotificationPermissionForSafari();document.getElementById('indigitall-button').remove();" style="position: fixed; bottom: 15px; left: 15px; z-index: 999; transition: .2s ease;">
        <a style="display: block; border-radius: 50%; border: 1px solid #74d227; width: 50px; height: 50px; color: #fff; background: linear-gradient(to bottom,#89da3e 1%,#6dbf37 100%); text-align: center; vertical-align: middle; line-height: 60px; cursor: pointer; box-shadow: 0 0 3px #000; transition: .35s ease; transition-property: all; font-size: 20px; text-shadow: 0 0 2px rgba(0,0,0,.5); position: relative;">
            <svg style="width:24px;height:24px" viewBox="0 0 24 24">
            <path fill="#f5f5f5" d="M21,19V20H3V19L5,17V11C5,7.9 7.03,5.17 10,4.29C10,4.19 10,4.1 10,4A2,2 0 0,1 12,2A2,2 0 0,1 14,4C14,4.1 14,4.19 14,4.29C16.97,5.17 19,7.9 19,11V17L21,19M14,21A2,2 0 0,1 12,23A2,2 0 0,1 10,21" />
            </svg>
        </a>
        </div>`;
        document.getElementsByTagName("body")[0].appendChild(button);
    }
}
</script>

<script src="/indigitall/sdk.min.js" onload="onIndigitallLoaded()"></script>
App Key
Don't forget to replace the App Key with your project data.
Advanced
In advanced, you can use various parameters to improve the effectiveness of your notifications.
- Chunked delivery: If chunked delivery is enabled, you can set a rate of notifications per hour that will be delivered every time you send a campaign instead of delivering them immediately.
Chunked delivery does not allow the use of Best Moment (AI module).
- Notifications per hour - You can set the number of notifications sent per hour. The minimum number of notifications per hour is 12,000. (Setting 12,000 notifications per hour is equivalent to sending 1,000 notifications every 5 minutes every hour).
- Add exclusion time - choose the time slot in which you do not want notifications to be sent.

- Add a monochrome logo to your project - monochrome image that will be displayed at the top of notifications, for chrome on android.
- Enable multidomain - If you enable the multidomain option, all the domains that are connected to this project will behave as one.
App Push
Android
You need to upload the certificate by June 2024
Apps using the deprecated FCM legacy APIs for HTTP and XMPP should migrate to the HTTP v1 API at the earliest opportunity. Sending messages (including upstream messages) with those APIs was deprecated on June 20, 2023, and will be removed in June 2024.
Until now to send app push notifications to android devices it was necessary a GCM/FCM Server Key provided by FCM. Now it is necessary to upload a certificate to continue sending app pushes. Please discover here how to upload this file.
For the Android platform, the fields to configure are the following:

FCM Server Key: This field is no longer needed and we will remove it in the next months. Now only it is necessary to upload the certificate. (Only for your info: this key is provided by Firebase Cloud Messaging (FCM). You can register in FCM, you can follow this tutorial to discover how to do it).
NEW! Upload the Certificate: You need to upload a JSON file provided by FCM. We explain here how to obtain this certificate. Remember! It is compulsory to upload it by June 2024.
Allowed apps market ids: You can specify the market identifiers of the applications that can use your project. If this field is empty, all applications are accepted.
Harmony
For the Harmony platform, the fields to configure this platform are the following:

HMS Client ID - This key is provided by Huawei Mobile Services (HMS). You must register in HMS, you can follow this tutorial to learn how to do it. This field is required to receive notifications on Android.
HMS Client Secret - This key is provided by Huawei Mobile Services (HMS). You must register in HMS, you can follow this tutorial to discover how to do it. This field is required to receive notifications on Android.
iOS
For the iOS platform, the fields to configure this platform are the following:

For iOS there are two possible configurations, only one is needed:
-
P12 Certificate: You must upload a P12 certificate file provided by Apple and its password if it exists, you must also provide the application package ID.
-
P8 Certificate: You must upload a P8 certificate file provided by Apple, you must also provide the Bundle ID, Team ID and Key ID application.
Advanced
In advanced area, you can use various parameters to improve the effectiveness of your notifications.
- Chunked delivery: If chunked delivery is enabled, you can set a rate of notifications per hour that will be delivered every time you send a campaign instead of delivering them immediately.
Chunked delivery does not allow the use of Best Moment (AI module).
- Notifications per hour: You can set the number of notifications sent per hour. The minimum number of notifications per hour is 12,000. (Setting 12,000 notifications per hour is equivalent to sending 1,000 notifications every 5 minutes every hour).
- Excluded hours: Choose the time slot in which you do not want notifications to be sent.

Add a monochrome logo to your project - monochrome image that will be displayed at the top of notifications, for chrome on android.
Enable multidomain - If you enable the multidomain option, all the domains that are connected to this project will behave as one.
Email
To send email campaigns, you need to create the email configuration:
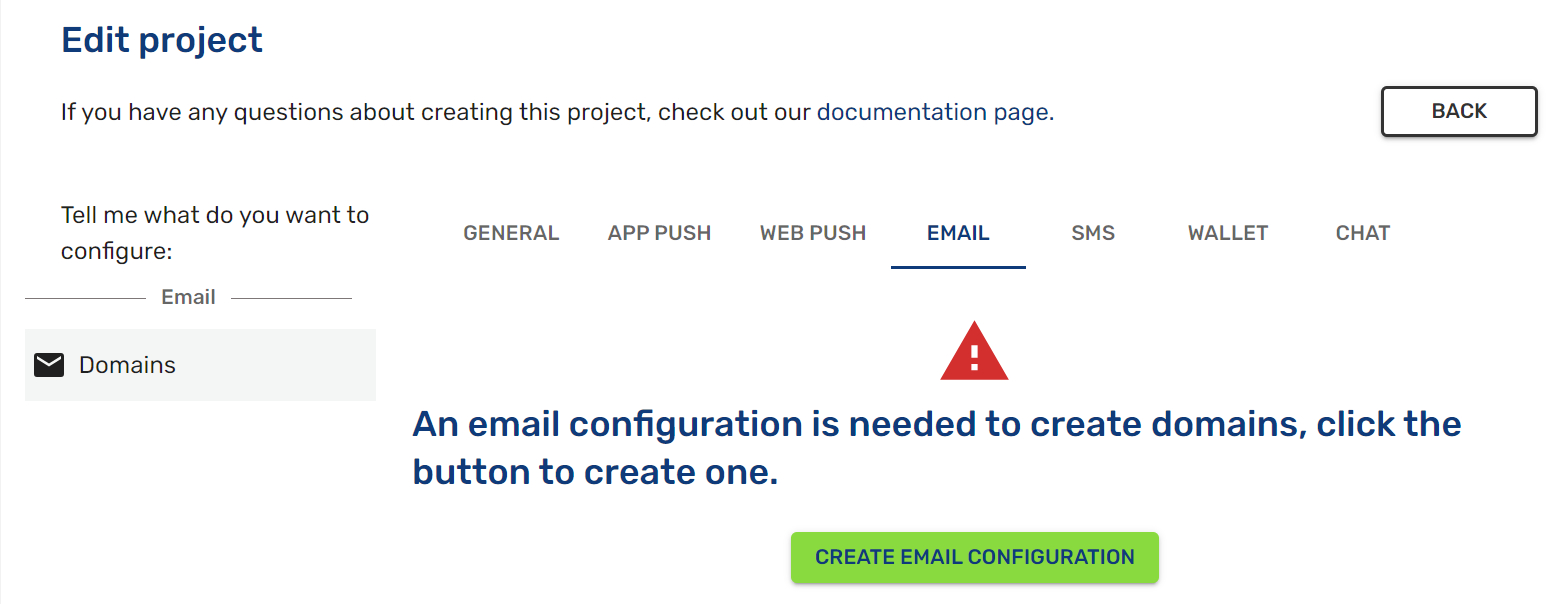
For this, you need a domain name (e.g. our_company) and the domain (e.g. indigitall.com).
Also it is possible to create the senders. The Sender or Email Sender gives information from where the email will be sent and it will appear in the field "From:" when the email is received. You can see all information here.

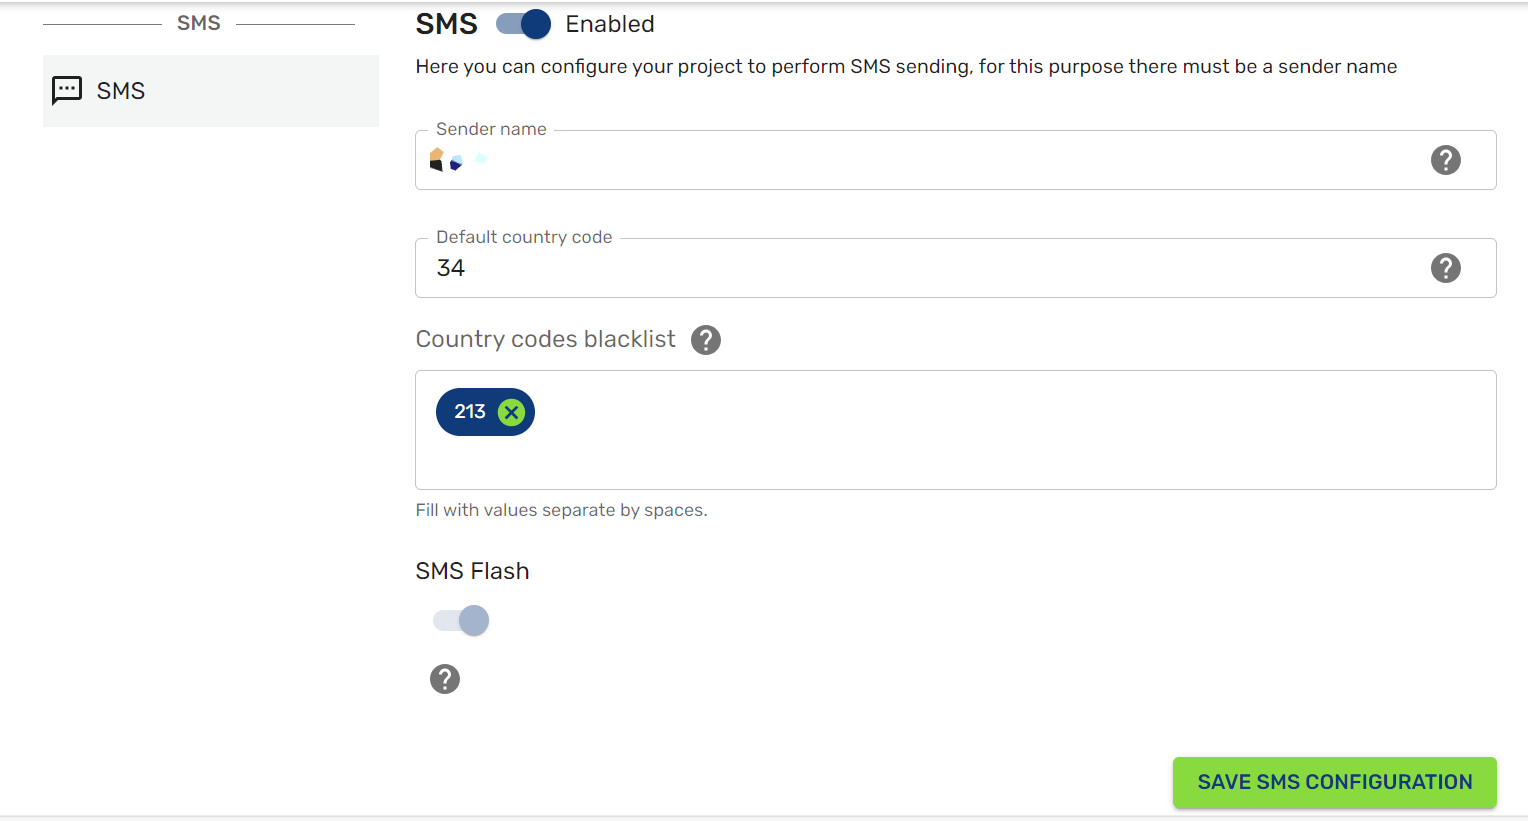
SMS
It is necessary to create the SMS configuration.
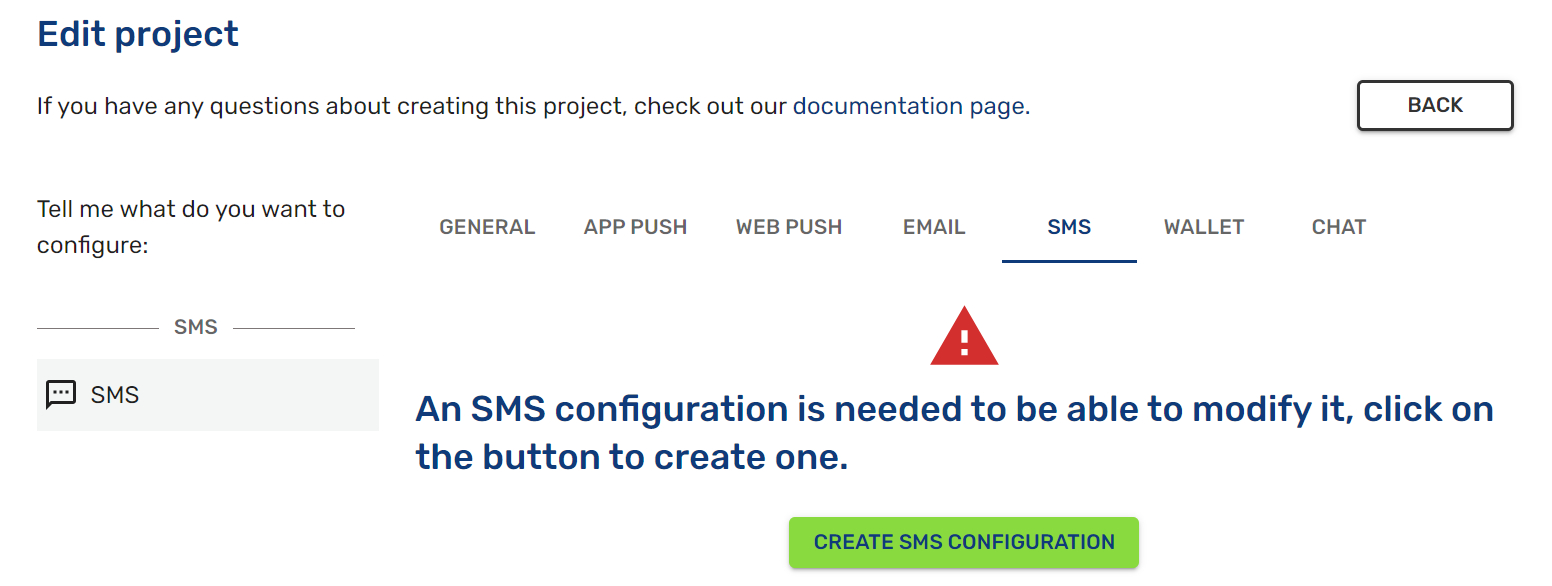
For this area, you need the following fields:
- Sender name: The sender is the name or number that the user will see as the sender of the message received.
- Default country code: The country code to send SMS.
- Country codes blacklist: Sendings will not be performed to the indicated countries.
- SMS Flash: It is displayed directly on the screen, without the need to open the SMS application.
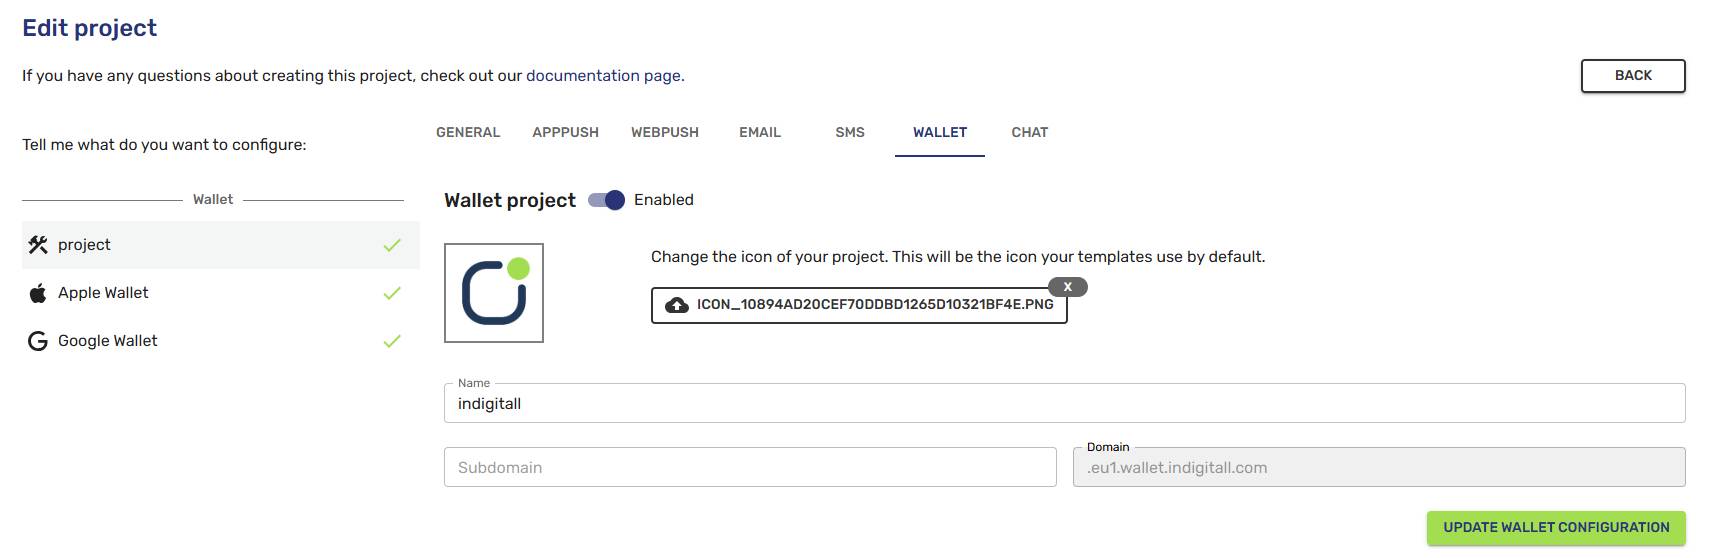
Wallet
It is necessary to enable the project. Then, you will be able to upload the icon (it will be configured for all new templates), assign a name, and the previously chosen subdomain will also appear.
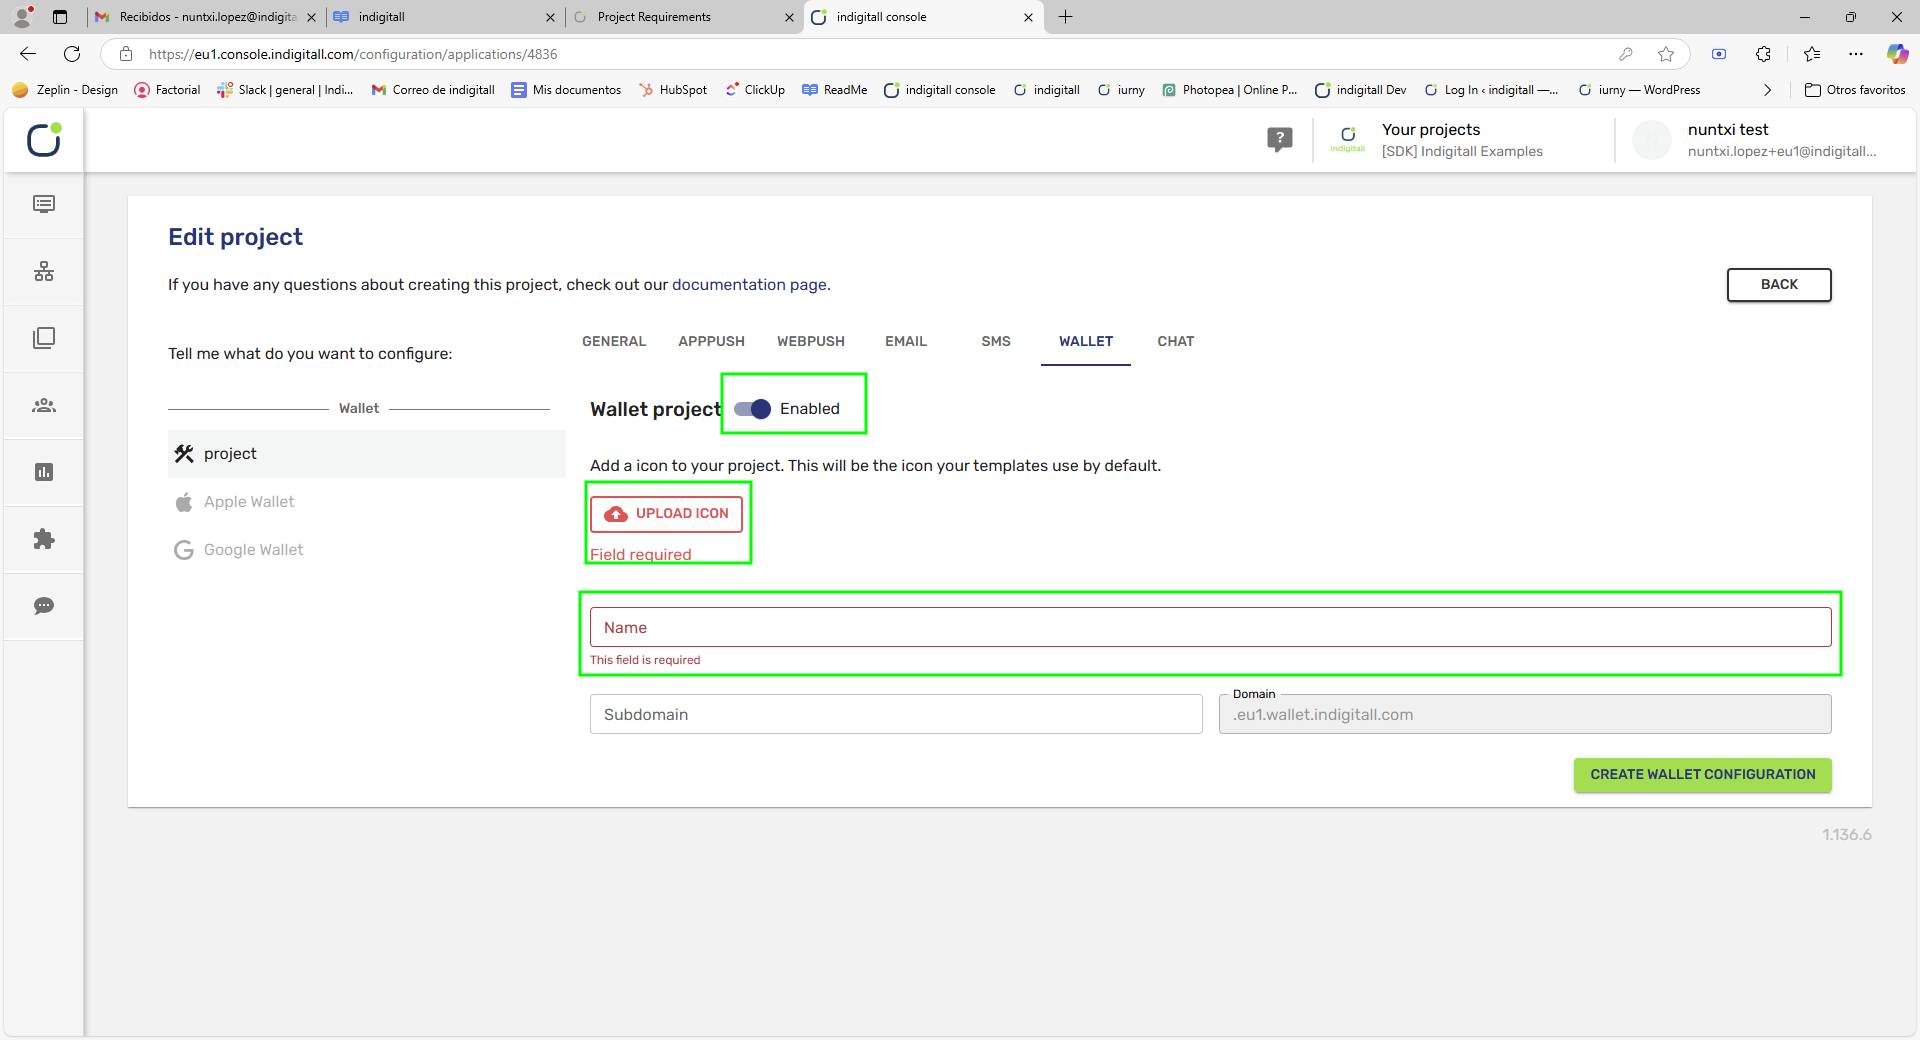
You also need to configure the Apple (iOS) and Google (Android) sections as explained in the specific sections.
Chat
You have several options in this area to customize your service.
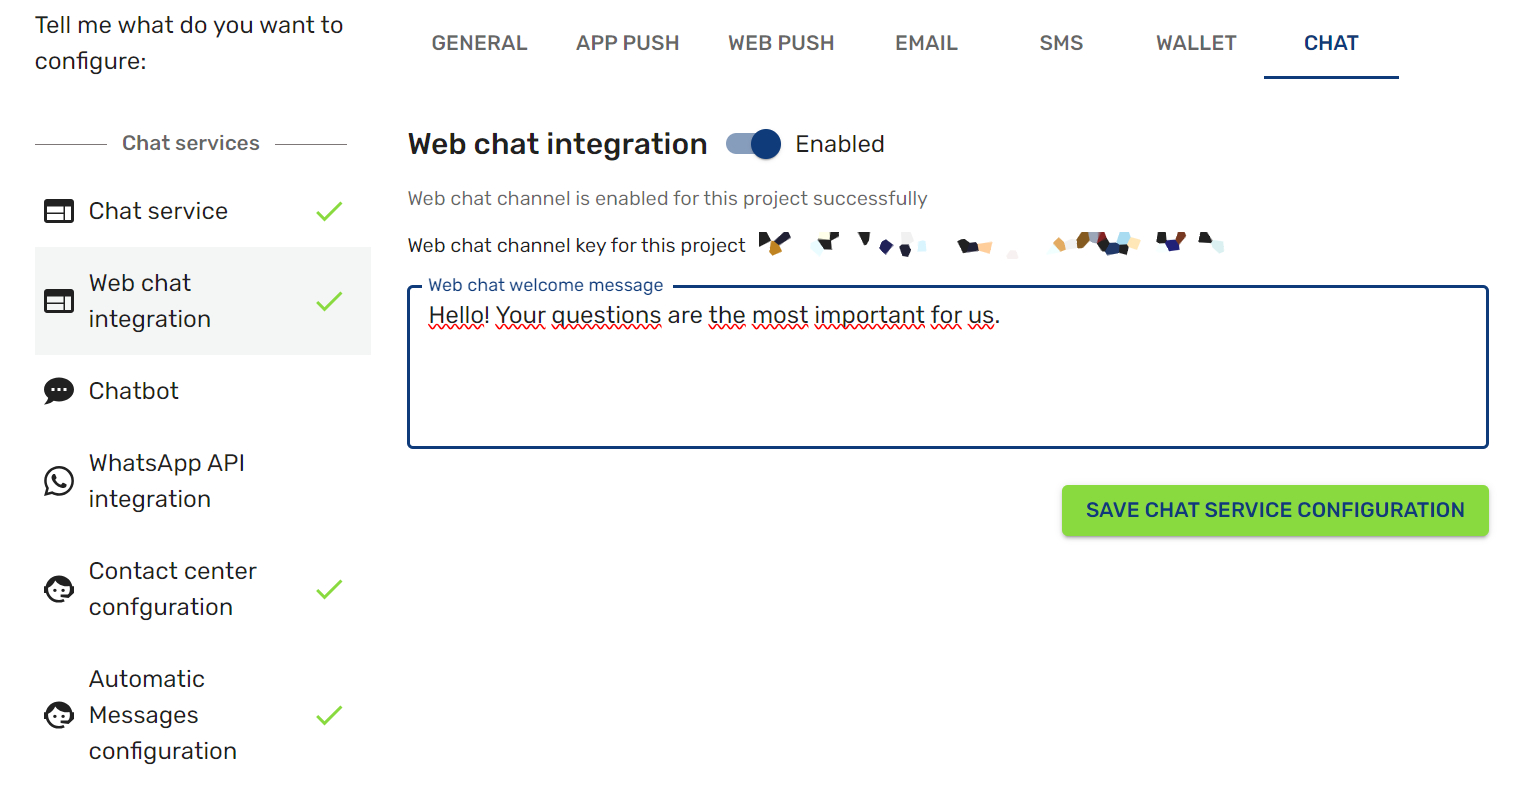
Web Chat Integration
You have the option to write a welcome message for your chat service.
WhatsApp API Integration
indigitall is Meta Business Partner, we help you through the process. Please contact support department: support@indigitall.com
Contact Center Configuration
You can configure some parameters related to the contact center service.
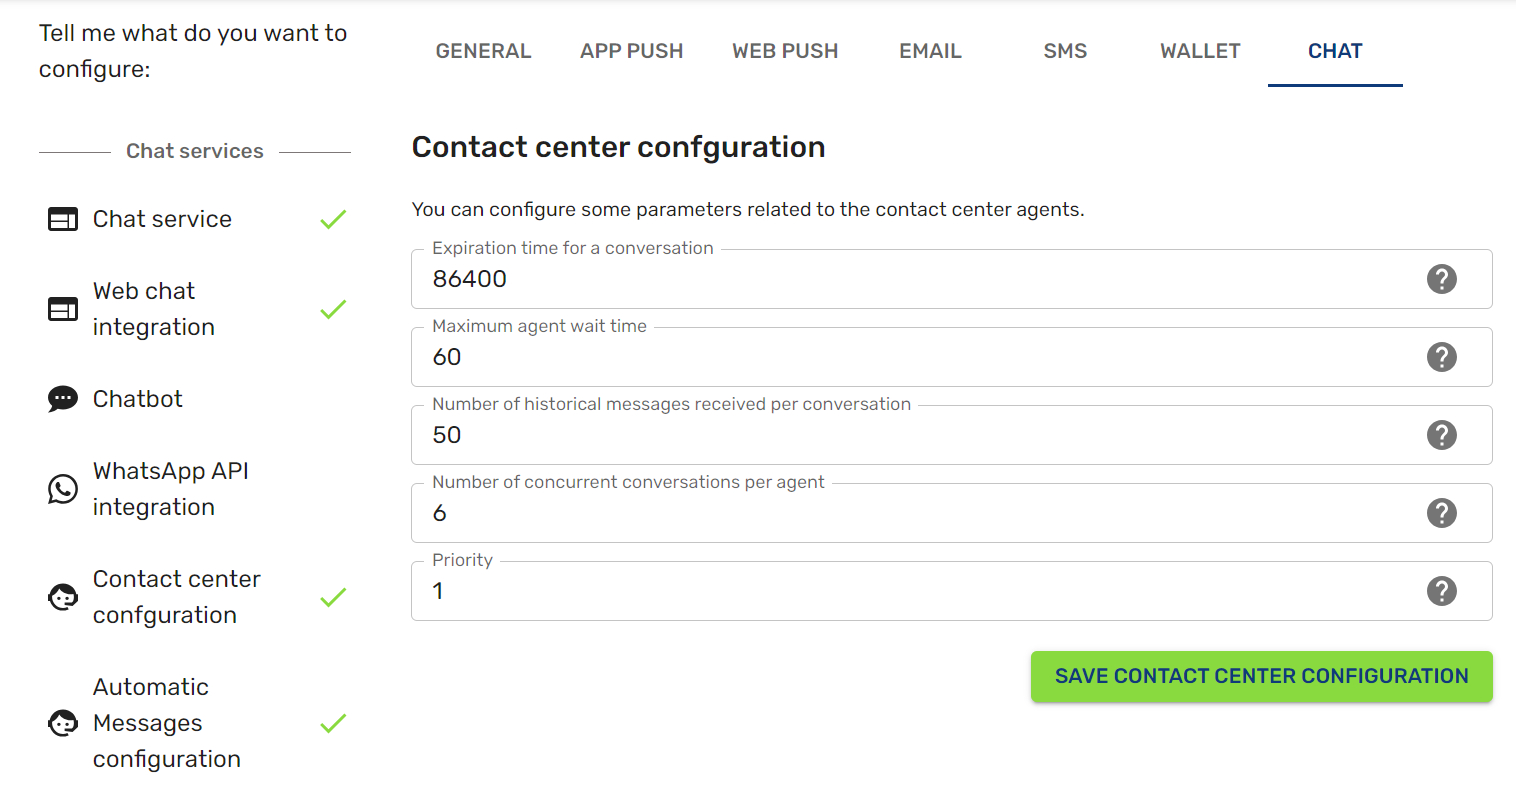
- Expiration time for a conversation: Amount of time after the expiring date of the conversation, it is expressed in seconds. The minimum time is 5 minutes and the default value is 86400 (1 day).
- Maximum agent await time: The maximum time that the user will wait for any agent.
- Number of historical messages received per conversation: The number of historical messages that the agent can see when a conversation is assigned. The default value is 20.
- Number of concurrent conversations per agent: Maximum of conversations that can be assigned to an agent. Default value is 6.
- Priority: Write a whole number greater than or equal to zero. The greater the number, more priority it will have.
Automated Messages Configuration
You can customize several fields in this area:
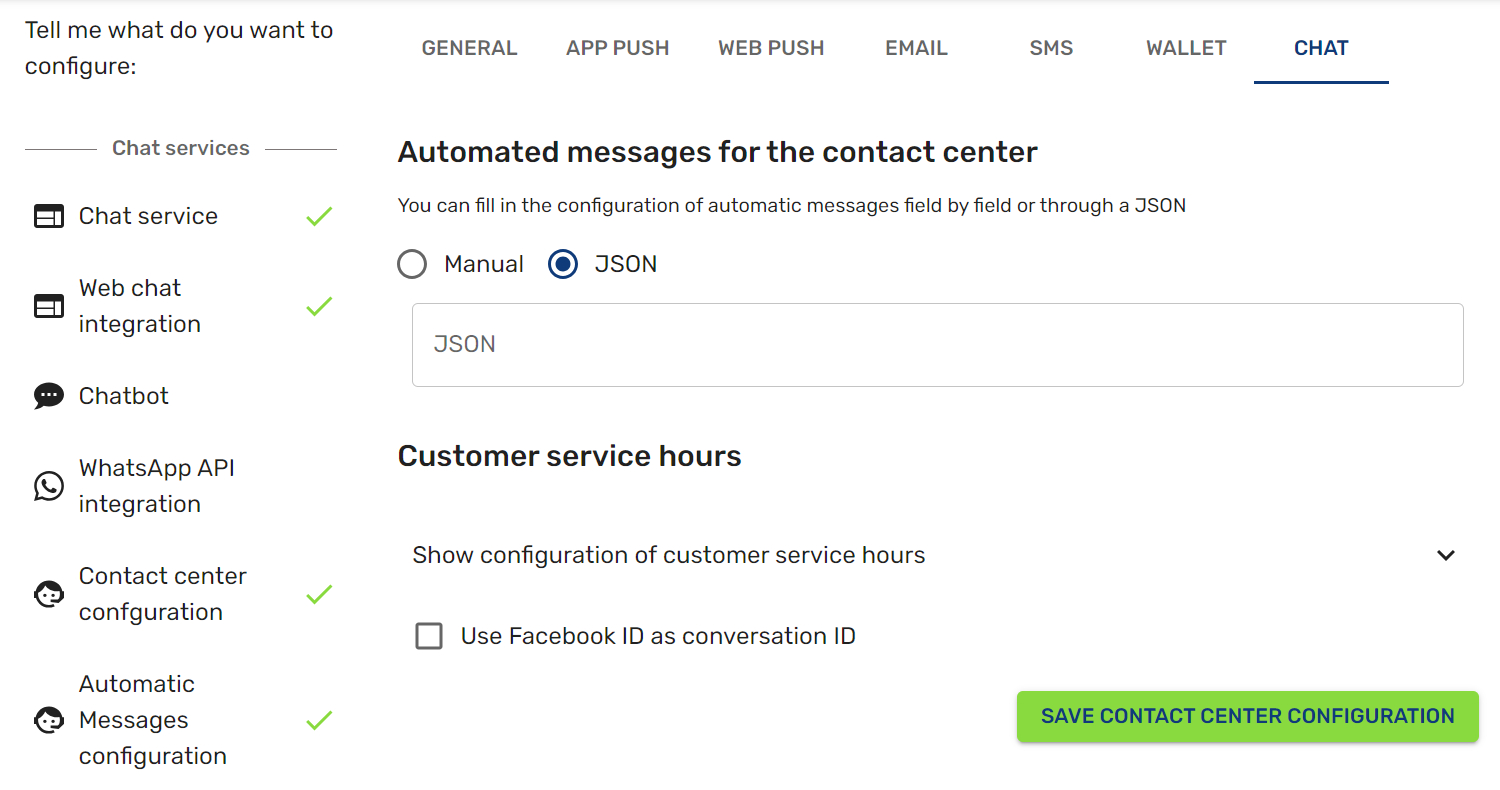
Automated messages for the contact center
You can select Manual or JSON according how you will give the instructions. If you choose JSON file, you can write your code in the correspondent field while if you select Manual then you need to choose your options in each field.
- To notify users that their conversation is going to be transferred to an agent
- To notify users that their conversation has been assigned to an agent
- To notify users that their conversation is going to be transferred to another agent
- To notify users that it was not possible to assign their conversation to an agent
- To notify users that their conversation has been successfully transferred to an agent
- To notify users that it was not possible to transfer their conversation to another agent
- To notify users that the conversation with the agent has ended automatically
- To notify users that the agent has ended the conversation
For all fields, you can select the desired type of content: Null / Text / Document / Image / Audio / Video
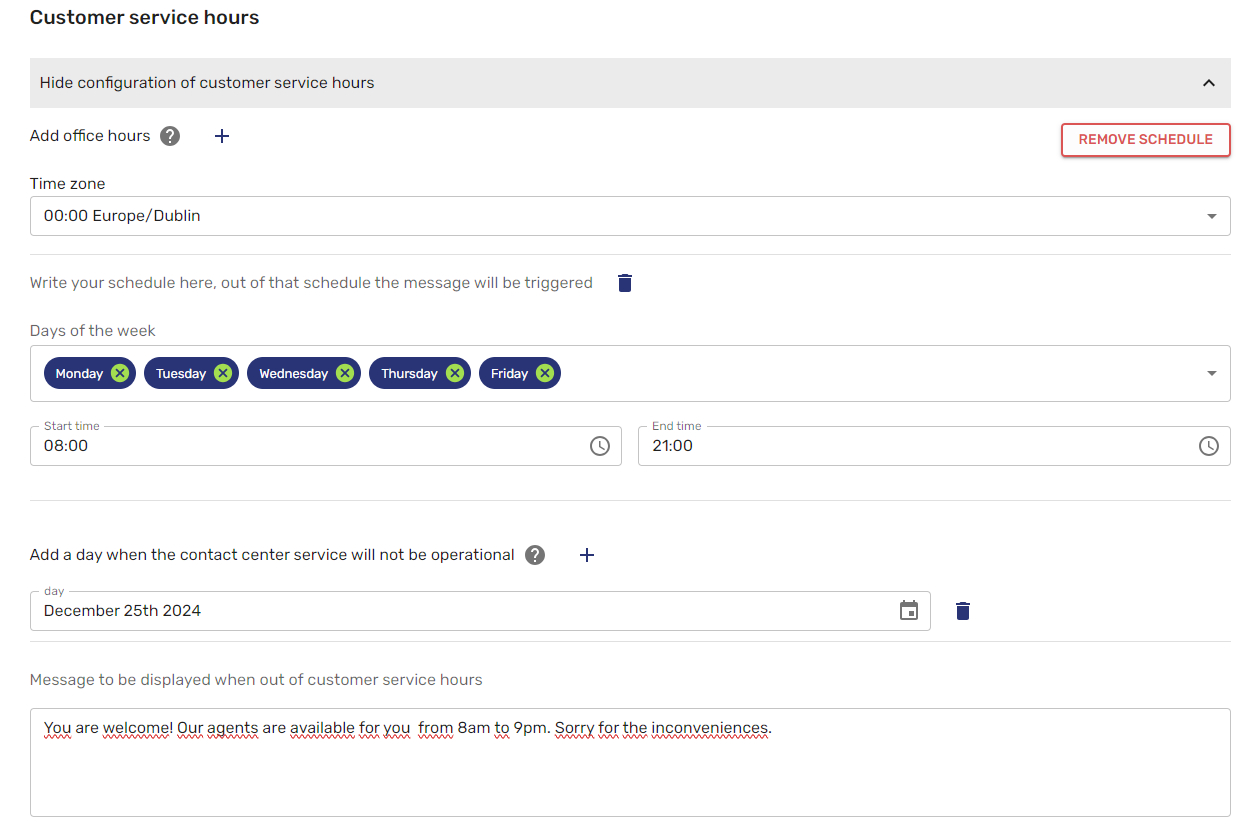
Customer Service Hours
Facebook ID
It is possible to use the Facebook ID of the user to identify the conversation as a conversation ID.

Updated 2 months ago